Summer Camping…in a Shabby Chic Camper

Summer Camping…in a Shabby Chic Camper

When summer arrives, I invariably think of hitting the road for a camping trip to one of the many great campgrounds situated along California’s Pacific Coast Highway or a State Park.

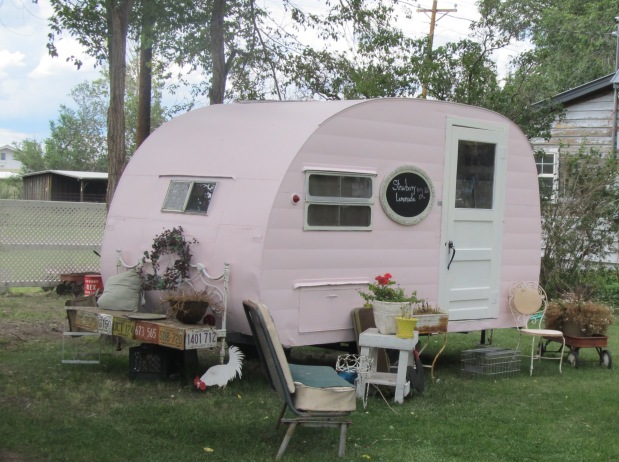
shabby chic vintage camper trailer

This vintage pink and white trailer named “Audree” has been revamped for the ultra-feminine, glamour-camper, or “glamper.”

While I enjoy the experience of the great outdoors and pitching my own tent—especially the type with a netted peek-a-boo roof that allows you to sleep under the stars without the accompanying mosquito bites—I have recently started fantasizing about hitting the campground in high style—in a glamorous camper, or glamper.

Glamping, as it is called by trend-spotters, has apparently become a thing in both the US and Europe.

The  glamping movement involves designer-camping enthusiasts, mostly women, buying up vintage motor homes and camper-trailers, and renovating or redecorating them in a variety of design styles. They even name their upscale campers—kind of like sailors name their ships—with monikers like “Marilyn” or “Jeannie.”

A recent search on the Internet, particularly Pinterest, using the search term “glamper,” proffered up a plethora of photos.
Shabby Chic camper trailer

I would love to park this shabby chic camper in my backyard as a private retreat where I could read or host afternoon teas.

I found images of vintage motor homes and caravans with interiors that had been done up in shabby chic, French country, coastal chic, junk gypsy, mid-century modern, and more.

While many of these designer-cum-campers join “Glamping Clubs” and meet up with like-minded Glampers at luxury campgrounds, others forego the actual camping trip, and just park these little caravan cuties in their driveway as a “spare room” to use as a personal retreat or for kids’ summer sleep-overs.

I love this idea! The camper-as-spare-room idea would only work for those with a flat driveway, of course.

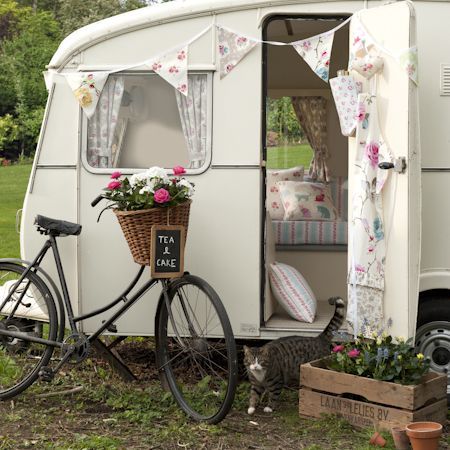
French Country decor

It’s hard to believe this French Country sitting area is inside a camper! I’d feel right at home here. Visit this European designer’s blog to see her amazing “before” and “after” renovation photos.

(My driveway is on a steep hill, so this option won’t work for me. I have visions of my teen daughter and her pals rolling away in the night as they slumber.)

Let’s get back to camping.

What could be better than fusing my love of the outdoors with my love of design, and all things shabby chic, by creating a romantic shabby chic camper?

My girlie-girl camper would be my own little of cocoon of coziness.

I think I’m favoring a motor-home or RV as one drivable unit, rather than a trailer I’d have to pull behind a truck.

I’m already imagining how I’d white-wash all the faux-wood paneling inside a 1970s motor home.

I’d add paint trim and other accents in shades of turquoise, aqua and cerulean for a “shabby beach” look.

Pollyana, the happy little camper

This sweet sleeping nook is in a camper called “Pollyanna.” See more pictures and read more about it at this American designer’s blog.

It would be great to come in from a day of fun in the sun at a coastal campground, grab a cold drink from the camper fridge, and plunk down on my cozy camper couch decorated with easy-wear white denim slipcovers and soft toss pillows.

I also wouldn’t mind curling up in my flouncy, floral sleeping nook with a good book.

The indoor toilet wouldn’t be such a bad thing, either.

Late-night card games around the pull-out table after kayaking on a mountain lake?

Sleeping under a fluffy duvet after a full day of hiking in the forest?

Peering at the great outdoors through sun-washed linen drapes as the sun comes up?

Check, check, and check!

Cottage style camper

A cottage style interior in red and aqua has loads of charm. I want the top bunk!

Hello summer…and here’s to dreaming about a cozy cottage on wheels. Happy camping to all!

To read a more comprehensive description of glamping (accompanied by some great photos of both vintage caravans and modern camper-trailers that have been fully renovated), visit designer Joni Webb’s “Cote de Texas” blog. She nailed it!

You’ll find even more camper photos at Cozy Little House, where they’ve documented a range of vintage glampers, from those redone in black and white stripes to one that looks like a 1950s diner.

More great “glamping” coverage can be found at AnyoneCanDecorate.blogspot.com, including the trend of glamping in fancy tents.

Beach Cottage Art on a Shoestring Budget

Beach Cottage Art on a Shoestring Budget

When you think of the walls of a beach cottage, you probably think of bright whites and pale, sun-washed blues. But what makes those walls come alive? Add a touch of whimsy to your space and a sense of a beach life well-lived with beach cottage art!

IMG_0875A beach cottage, by definition, is a relaxed space—a place where nothing is too precious, or likely to be ruined by sandy feet or ocean-drenched pups.

A beach cottage is a place where friends and family always feel right at home, and the art you hang on your walls should reflect this laid back attitude. And, of course, beach cottage art should evoke the light and colors of the sea.

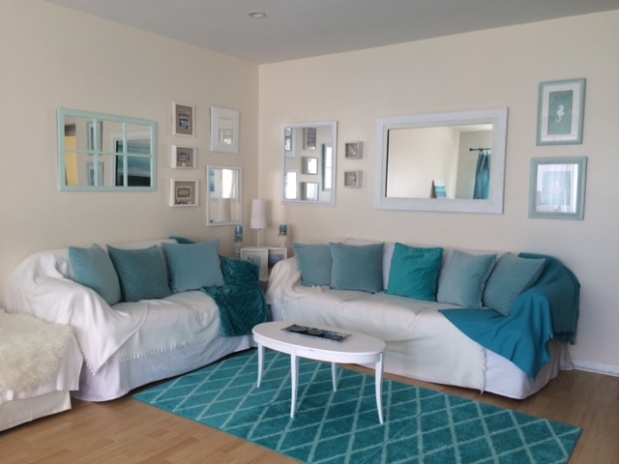
beach cottage artCreating or sourcing beach cottage art doesn’t require much money. A wall of mirrors and coastal art in weathered wood or whitewashed frames can be really easy and inexpensive to pull together.

If you want to exercise your inner “Van Gogh,” you can also try your hand at sweeping some brushstrokes of ocean blues across a few white canvases you purchase from an art supply store like Aaron Brothers.

IMG_0876If you don’t have any old mirrors on hand that would lend themselves to repurposing for the coastal look you’re trying to create, hit a few yard sales over the weekend. Keep an eye out for older, vintage mirrors whose frames can be transformed with a couple of coats of white paint. Pale aqua, deep teal, and bright turquoise paint shades will also work well, adding pops of color to your wall. These colors, used sparingly, can be chosen to coordinate with other accessories, like throw blankets, toss pillows and candles. Pops of coral pinks, reds or oranges can also work well as a secondary accent color, if you use these shades on just a frame or two.

IMG_0850Local thrift stores can be great places to source mirrors and wall art for your beach cottage. You may even find some hand-painted seascapes in old frames that can be refreshed with a coat of paint. You might also hunt for a few empty frames in a range of shapes and sizes which, when repainted in white or varying shades of blue—or another color from your design palette—can make an appealing art installation when arranged together on a wall. If you’d like to craft some shadow boxes filled with art and seashells for a mixed media project, Ikea can be a good source for those.

IMG_0854When repainting frames, you’ll need to assemble them in a well-ventilated area. Be sure to protect the mirrors and artwork. Lay your frames out on a tarp or some old newspaper, and use painter’s tape to mask off the glass or art so they don’t get splattered with paint. If you’re using spray paint, you’ll need to cover every surface that you don’t want to paint with plastic sheeting or newspaper. Once all the prep work is done, you’re ready to paint.

IMG_0857I prefer to paint wood frames with a brush. For wood frames, a light sanding with medium-rough sandpaper will rough up the surface just enough for the paint to adhere to. This process is sometimes called “giving the surface some tooth” in do-it-yourself parlance.

I use bright white paint for most of the frames I repaint for my beach cottage, but when I want to add sea-washed aquamarine, my two all-time favorite shades are “Lazy Days” and “Tranquility” by Valspar Signature paints from Lowes. Valspar’s “Bird Song Blue” also blends beautifully with the other hues. Used together, they look like worn sea glass.

Beyond Super White, the Dunn Edwards colors "Calm Waters" or "Coastal Breeze" work well when repainting old frames for beach art, as do "Lazy Days" and "Tranquility" from Valspar, and "Robin's Nest" from Benjamin Moore.

Beyond Super White, the Dunn Edwards colors “Calm Waters” or “Coastal Breeze” work well when repainting old frames for beach art, as do “Lazy Days” and “Tranquility” from Valspar, and “Robin’s Nest” from Benjamin Moore.


You can give each frame two coats of paint for opaque coverage, or use just a single coat of paint if you’re after a worn and weathered look.

After the paint has dried, you can rough up the edges and corners with some sandpaper. Use a light touch, and rough up the places where the frame might have gotten bumped or scraped over the years. This lends a “shabby beach” look to your art pieces.

Once the paint is 80% dried, you can carefully remove your painter’s tape and other coverings. Allow the frames to dry for another six hours or so.

Weather permitting, this is the perfect time to take a break and go for a walk along the coast to breathe in some salt air and soak up the scenery that you’re working to replicate on the walls of your home. IMG_1302Every painter needs a hit of inspiration straight from the source!

The next step involves configuring your painted frames and artwork into an arrangement by shape, size and color.

I like to arrange my artwork on the floor first, moving pieces around until I arrive at a pattern that is balanced in color and scale. I also try to consider how the pieces will fit above my furniture arrangement. I try to line up larger, heavier frames centrally over a larger sofa, for example, and then arrange smaller frames around that. Once you arrive at an arrangement you like, you’re ready to “transfer” the frames in this same arrangement on your wall. You can begin the adventure of hanging your art!

Starting with the largest piece first, use a pencil to lightly mark the wall with an “x” where your nail/s will go. I prefer to use just a single nail at the top center of each frame. This makes it easier to step back and straighten out any crooked frames as needed. For stability, I use more painter’s tape rolled up and affixed behind each corner of my frames. This helps protect the wall, keeps the frames from tilting askew, and holds them in place over time.

IMG_0867When hanging frames in a salon style, you don’t need to worry about keeping an exact distance between each frame—just eyeball it. Remember, beach cottage style means things are relaxed, not perfect! If you hang one frame a little too low (as I did), try propping a seashell or a starfish atop it to even things out. This can add a touch of fresh-from-the-beach charm, as well as a bit of texture. Above all, when hanging art in your beach cottage, loosen up and have fun with it. Best of all, if you manage to find some real bargains, you can easily decorate two to three walls of your beach cottage for under $100.

A few weekends later you can sit back and enjoy your handiwork…and the compliments that roll in with your visitors!