Shabby Chic Couture, Santa Monica, CA
A couple of weeks ago, I was invited to attend a paint workshop held at Rachel Ashwell’s Shabby Chic Couture store in Santa Monica, California. Featuring the just-released Shabby Chic Paint by Rachel Ashwell, the workshop was led by Chantelle Deimler and Jill Rinner, co-owners of the home shop Bungalow 47.
The Bungalow 47 design team has partnered with Shabby Chic to distribute these chalk & clay paints nationwide, so they have been traveling to various Shabby Chic Couture locations to demonstrate how to use them.
A short drive from my home, Shabby Chic’s Montana Avenue location in Santa Monica looks like a fluffy white delicacy—the crown jewel amont the many high-end boutiques that line this popular shopping street.
Entering the store is like taking a breath of fresh air as you leave the busy street behind and step into Rachel’s world of crystal chandeliers, creamy white walls, soft linens, and tasteful vintage furniture painted in time-worn pastels.
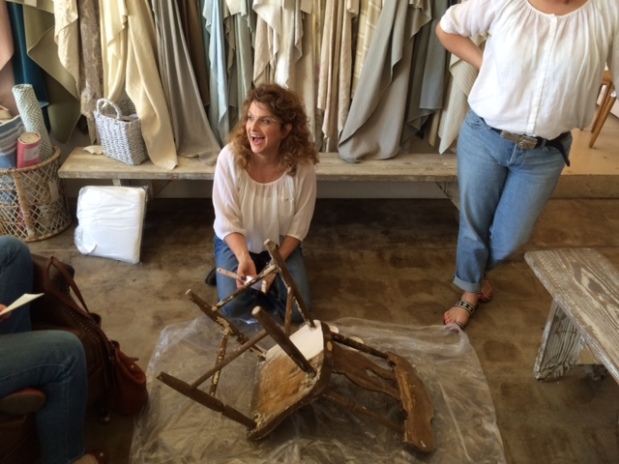
 Front and center as I walked in the shop was a small wooden chair sitting on a plastic tarp in preparation for the painting demonstration. Chantelle, Jill and the Shabby Chic staff welcomed me to join a group of other ladies who were seated on fabulous slipcovered sofas arranged around the soon-to-be-painted chair.

Tip: Pre-wash with a 50:50 mix of vinegar and water to eliminate bleeding through of old stains, and “pre-sand” a piece before you begin painting. When painting a chair, always start with it upside down.
I sank into sumptuous sofa cushions and whipped out my notebook and camera as Chantelle and Jill passed around the flyer showing the paint colors and explained that the formula for the paints is low-VOC (volatile organic compounds) and non-toxic.
These paints produce a flat, matte finish and are available in Rachel Ashwell’s signature palette—subdued shades like Lily White, Pink Petals, Dream Linen, and Malibu Bonne Blue. The line also reflects Rachel’s recent foray into deeper hues like Truly Teal, Beige Beauty, and Taupe Treasure.
The Shabby Chic paints are intended for furniture and home accessories (not walls), and will work on wood, plastic, metal or leather, and even on some upholstery (wow, I’ll be trying that!). The line includes a Clear Primer that can be used for better adhesion of the paint to various surfaces, as well as a Clear Coat intended as a top coat that seals the paint finish, once dried. As Chantelle started painting the wood chair in a soft, blush pink, Jill explained that neither the primer nor the top coat is necessary. However, the primer is recommended to prevent old stains in antique furniture from bleeding through over time.

Chantelle flips the chair over and begins painting the underside of the chair first. Tip: Manipulate the object you are painting, rather than moving around it, to save time.
The clear coat is recommended for items that will get heavy use. Chantelle didn’t prime the chair she was painting for the demonstration, and the paint adhered to the wood very well. The Bungalow 47 team advised that if you are repainting a shiny surface (like plastic or metal), it is best to pre-sand the surface to “rough it up” for better paint adhesion.
As she painted, Chantelle said that she prefers to use a brush, but if you don’t want paint strokes to show, you can use a water spritz bottle to soften those lines. You can also use the brush to stipple the paint or create other effects.
Jill told the group that a 50:50 mixture of paint to water is best if you are painting over fabric. Even better, when painting an upholstered chair, add 10% fabric softener to the paint mixture so the painted seat won’t crack when someone sits on it. Jill advised against painting a sofa that gets heavy use.
The 50:50 paint formula works best for lampshades or decorative chairs that will sit in a corner and get only “occasional use.”
Jill also advises that you skip the clear coat when painting upholstered items, and never wax a painted fabric.
Another tip from Jill: to get a crackle effect, use thicker paint and then hit it with a blow dryer on a high setting in certain spots until you see the paint begin to crack as it dries, giving it an aged look.
Chantelle handed me the brush so I could give it a try, and I found that this paint is very opaque, providing excellent coverage, and is extremely easy to work with. I was also happy to discover that when it dries, this paint doesn’t rub off on your hands or clothes, but “cures” to a solid finish that stays put (thanks to the clay in the mix?).
Watching Chantelle finish painting the chair, I noted how little paint she had used. She explained that if you use just one coat, a small 8-ounce sample of this paint will easily cover two chairs.

Jill provides painting tips during a tour of the Shabby Chic Couture store in Santa Monica, CA.
As Chantelle put the last strokes of “Pink Petals” paint on the chair, Jill gave the workshop group a tour of the store, so she could go over how to achieve the aged finishes seen on many of the furniture pieces on display.
She explained that you can use various weights of sand paper (220 or 120 weight are best for heavy distressing), or even nails and metal chains, to achieve the chippy paint look that embodies “shabby chic.”
 Tip: Make sure distressing is not symmetrical, but heavier on one side than the other as if the furniture piece sat in a sunny window or got bumped frequently. Distress along the grain and along edges—never in the center of a table, for example, or on the front of a dresser where natural wear would not occur.
Jill suggested that to get the heavily chipped look that makes your painted fur niture “Rachel-perfect” for Shabby Chic, you can use a plastic paint scraper along the edges and corners after applying two heavy coats of paint. Once you’ve achieved the level of distressing you want, lock it in with the clear coat product.
Another interesting technique Jill mentioned, was to lay a large sheet of cheesecloth over wet paint to achieve a linear, grid-like web of cracked paint, which can give a piece a nicely textured antique appearance.
We circled back to the front of the store where Chantelle was now distressing the edges and corners of our workshop chair. (She had placed it outside for 30 minutes, where it dried quickly in the hot, California sun—those in other climates are advised to let the Shabby Chic Paint dry for at least 2 hours before beginning the distressing process.)
To my eye, the finished chair looked “Rachel-perfect” and ready to take its place alongside other chairs in the store that had already received the Shabby Chic treatment. I really like the subtle tone of the “Pink Petals” shade, and I plan to purchase a sample size of this color, as well as sample sizes of “Lily White” and “Caribbean Sea,” a faded aquamarine that would work well in my “shabby beach” cottage.

The finished chair, in “Pink Petals” Shabby Chic Paint by Rachel Ashwell.
I thoroughly enjoyed the painting workshop and meeting  the lovely ladies of Bungalow 47! I’ve ordered some samples of this paint, along with a quart each of Clear Primer and Clear Coat. Please visit this blog again soon to read future posts about my painting projects using these products, and some of the techniques that were shared in the workshop by Chantelle and Jill.
Readers interested in ordering some samples or quarts of this paint to try on their own, can find it for purchase on the Shabby Chic Paint website, managed and distributed by Bungalow 47. Happy painting!
Image credits: Seaside & Sage, with permission from Bungalow 47 and Shabby Chic Couture


