Creativity Keeps Me Calm Amid Coronavirus Chaos

As the coronavirus crisis gathered momentum in March 2020, I found myself turning more and more to creative projects around the house to calm my nerves. The COVID-19 news has been anxiety provoking, to say the least. It’s so disheartening to hear that more people are getting sick, while others are losing their jobs, and still others are behaving with utter foolishness! These tragedies are beyond my control, which contributes to feelings of frustration and helplessness. To help manage these feelings, and to keep myself busy during stay-at-home measures, I have been exercising my creativity.

IMG_6985
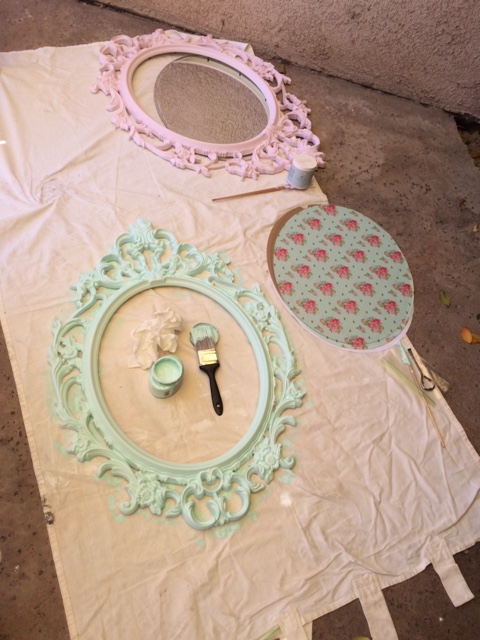
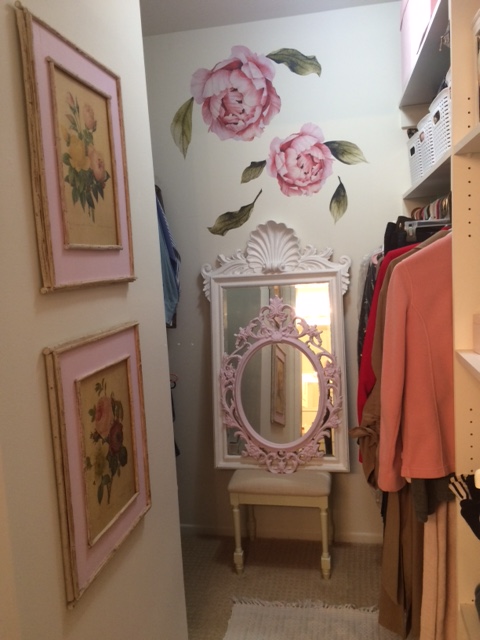
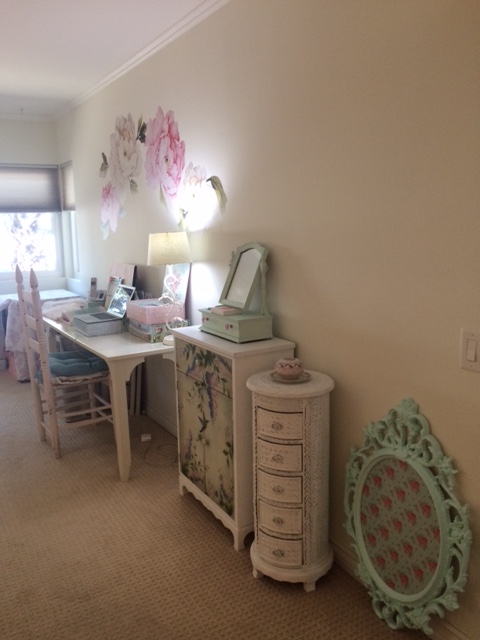
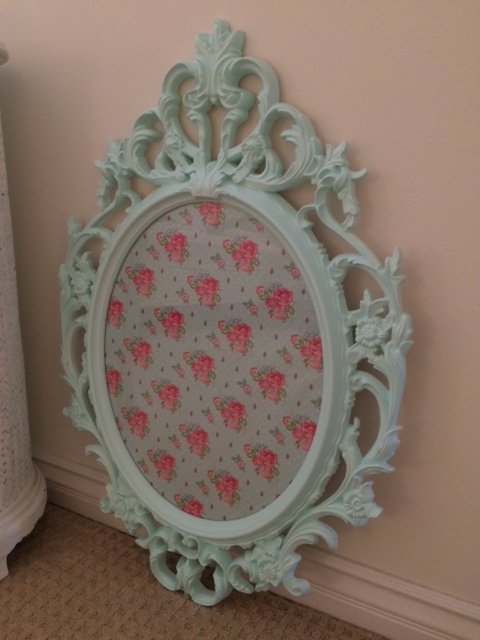
Whenever I am feeling low or anxious, my go-to for relieving stress and sparking joy is painting. If I can paint a picture or even a picture frame or a piece of furniture, brushing a beautiful color onto just about any surface relaxes me. When I am painting, I try to focus more on the process than on the end result. I think more about how the colors blend together, where I need to add more pigment to intensify the shade, or more water for a lighter wash of tint. In my case, the colors of choice are varied shades of aqua or pink. Aqua is so peaceful and soothing to my eyes and sensibilities. Pink just makes me happy!

IMG_6988

Some of my painted projects have turned out better than others, but that’s no matter. With every creative project, I find I am able to enjoy a moment’s peace when things get crazy.

IMG_6977

My other creative go-to for relieving stress is interior design. Lately, this has manifested as tinkering with home decor and rearranging my furniture into more workable formations or pleasing vignettes.

IMG_6981

I’ve reordered my bookshelves, cleaned out my closet, tidied up my work station, plastered some decorative decals on my walls, and touched up some vintage art pieces. My home exterior is looking better, and my psychic interior is feeling better!

IMG_6997

I’m sure some psychology expert somewhere has studied the therapeutic effect of different colors on our amygdala, the nervous tissue in our brain’s temporal lobe that governs our response to stress.

IMG_6994

Some other expert has, no doubt, written about using furniture rearrangements to establish order, and using color therapy or DIY hobbies as a kind of “moving meditation” to soothe our souls. But I don’t want to over-think this. All I know is, it works! Painting and other forms of creativity allow me to let go of all the nonsense and just breathe for a bit.

That’s what I’ve been doing lately. What design or creative projects have you been working on? What colors make you happy? How have you been using creativity to relieve your stress and find moments of joy amid the chaos? If you haven’t tackled a creative home project yet, I highly recommend it!


DIY French Country Dining Chairs

DIY French Country Dining Chairs

Sometimes a project just kicks your butt. Such was the case with my recent DIY French country dining chairs using that hot trend: chalk paint. Why does no one tell you that chalk paint rubs off? Now, I know that most DIYers use a product called Annie Sloan Chalk Paint, which probably doesn’t rub off. I’ve heard her paints work great for refinishing furniture in the shabby chic and French country styles, among others. Well, I couldn’t find any Annie Sloan paints at my local Michael’s crafts store, so I went with something else.

Recycled cottage chairs

I “recycled” these 2 cottage chairs from a dumpster. Cost? Zero dollars.

That “something else” was sitting on a shelf in the unfinished wood project aisle at Michael’s. There were actually two different chalk paint product lines available there. The first was by Americana Decor, which offers a selection of “Chalky Finish” paints in faded pastels, as well as “Creme Wax” and “Soft-Touch Varnish” as two options for sealants. This company also offers a great line of French Country stencils, to add that touch of Provence to your DIY French-inspired projects.

Americana Decor Chalky Finish paint products

Americana Chalky Finish paint products

Since I was going for a French Country look, I nabbed an adorable French Inn stencil, with the intention of stenciling the motif onto the seat of each dining chair. While I was at it, I also nabbed one bottle each of Americana Decor’s Creme Wax and Soft-Touch Varnish, just in case I needed to seal my roughed-up edges (I’m so thankful I did, but more about that later.)

The second paint product on the shelf was spray on Krylon Chalky Finish Paint. I’ve used Krylon spray paints before for my smaller decorating projects, and they have worked great. I had no idea they were now offering Chalky Finish paints!

Spray on Krylon Chalky Finish Paint

Spray on Krylon Chalky Finish Paint

I spotted a can in “Tidal Blue,” a beautiful shade of teal, and one of my favorite colors. That hue would be perfect for these cottage-style chairs, and would add a nice pop of color to the dining area of my aquamarine-accented “shabby beach” apartment in coastal California.

Another bonus: cottage chairs can be time-consuming to paint, so spray painting can be a real time-saver. Theoretically.

Scraping and cleaning the chairs

Prepping the chairs required some elbow grease: scraping, cleaning and light sanding.

Time to clean up the chairs.

I found these two shabby “chaises” in a dumpster last Sunday (yes, I’m all about recycling and upcycling, and I’m not ashamed to confess to some dumpster diving in my hunt for shabby chic furniture and other treasures), so they were pretty grubby.

I scraped off old dried paint globs, scrubbed the chairs down with dish soap to remove the soot and grime, and gave them a very light sanding with a sanding block of fine sandpaper.

Spray painting the chairs

Spray painting the chairs was messy and smelly…and required 2 cans of paint.

After prepping a work area behind my building with a large drop cloth, I donned my paint scrubs, put on a specially-ventilated face mask (spray painting can get messy, and it smells noxious), and got down to business. I sprayed using short, even spurts, just as instructed by the experts on HGTV.

In no time flat, I had used up my entire can of “Tidal Blue” paint, and it only covered one chair and one-third of the second chair. I headed back to Michael’s for another can of paint. More than an hour later, both chairs were covered with a good coat of paint, and I took a breather. Man, those face masks are hot and that spray on stuff smells bad!

I let the chairs dry for a little over an hour, making sure they were dry to the touch before I handled them. I carried them back to my patio, and looked down to find that my arms and hands were covered with teal chalk. Lesson learned: chalky spray paint is…chalky.

French Country stencil

A French Country stencil for the seat of each chair.

I forged ahead with stenciling the chair seats, figuring I could worry about sealing the chalk paint later. For my stenciling I decided to use white gesso, which is the paint base that artists use to paint their canvases pure white. Gesso works well as a whitewash on unfinished wood, and I’d been wanting to try it as a stenciling medium. Bad idea.

Stenciling with gesso

Stenciling with gesso…not recommended.

Even after I dabbed off the excess paint on a rag, the gesso was far too runny to serve as a good stenciling medium. I persevered, figuring I could worry about tidying up any really messy edges later. From a distance, the chairs were looking beautiful, but this project was not going as smoothly as I’d anticipated.

What a mess!

What a mess!

Should I repaint the seats of the chairs and start over with the stencils? I switched my focus to sanding the edges of the chairs to give them a slightly battered, French Country look. My hands and sanding block were soon covered in teal chalk. What a mess!

Taking a coffee break

Taking a break with a cup of caffe mocha at The Yellow Vase in Palos Verdes, CA.

I decided to take a break. A nice walk along the beach and a cup of java are always a good combination for alleviating frustration and coming up with new solutions! A little chocolate never hurts, either, so I headed out to one of my favorite Parisian-style cafes, The Yellow Vase in Palos Verdes, and ordered an extra large caffe mocha.

Sufficiently caffeinated and re-inspired, I returned home to tackle the “chair problem.” Those sloppy stencils didn’t look so bad after all, especially without my glasses on. The messy paint kind of gave the lettering softened edges, lending them an aged look. I was actually going for an old-world village cafe look, so I left the stencils as they were.

Soft-Touch Varnish from Americana Decor

Applying a coat of Soft-Touch Varnish to seal the chalk paint.

I had two options for sealing the chalk paint: a spray on “Wax Coating” from Krylon or the small bottle of varnish from Americana Decor. I didn’t think I could face another spray painting session, so I opened up the bottle of Soft-Touch Varnish from Americana Decor.

The label on the back promised the varnish was low odor, scratch and rub resistant, easy to apply with a brush, and would seal any chalk paint or acrylic paint.

Wet varnish

The varnish looked milky when wet, but dried clear.

The label on this product was true to its word. The varnish brushed on a bit thick and milky-colored, but dried beautifully–clear and virtually invisible.

This handy varnish left the chalk paint completely sealed, and retained a matte finish.

DIY French Country Dining Chairs

Two DIY French Country dining chairs, dried, sealed and delivered.

I let the varnish dry for the recommended two hours, and then ran a white paper towel over every nook and cranny on each chair. No more “teal chalk” rub off. The chairs were sealed.

Voila! The road to completion was a bit long and bumpy, but I now have two DIY French Country chairs with a touch of coastal chic. Mission accomplie!

My recommendation for anyone who wants to try this: definitely plan on sealing any furniture you refinish with spray on chalk paint. And, be sure to perform a “white glove” test when you’re done and the paint has dried to make sure the paint doesn’t come off on you, or your guests.

I’d like to find two more dining chairs to match or complement these ones, and I’ll try chalk painting again, but will most likely try the brush-on kind next time. I’m more prepared after this experience, and also now that I’ve read this helpful how-to blog post on “How to Paint a Chair with Chalk Paint” from Anne over at White Lace Cottage.

I’m open to suggestions from other furniture DIYers who’ve had success with chalk paints, so feel free to leave a comment with any tips or techniques you’d like to share! 


How to Shabby Chic a Table

How to Shabby Chic a Table

I’m no Rachel Ashwell. In other words, I’m not the founder of a home design empire, nor the veteran of countless years of vintage furniture shopping and refurbishing. However, I’ve read nearly all of Rachel Ashwell’s design books, poring over pages and pictorials that describe how she sources old pieces that have just the right shabby chic vibe, and spruces them up until she achieves that romantic “old-new” look. As described in “Rachel Ashwell’s Shabby Chic Treasure Hunting and Decorating Guide,” she finds special pieces that others might overlook, and gives them a fresh, new look that deserves a coveted spot in a “shabby chic” home. I need a new coffee table for my tiny apartment, and I’m going to try and replicate Rachel’s methods. How hard can it be?

Finding the right tableWith hours of research under my belt, I head off on a “shabby chic” junket. I scour thrift shops in the Beach Cities of Los Angeles to find the perfect piece of furniture that is calling my name. I’m going to test out my “eye” for design and keep a lookout for a table that will lend itself to a cottage or shabby beach style. I need to keep an open mind, but the coffee table must: 1. Be round or oval; 2. Have romantic lines; 3. Look good painted white; and 4. Fit into the trunk of my Toyota.

The first couple of thrift stores I visit have some nice mirrors and baskets, but not a great selection of furniture. The third thrift store, in Torrance, is full of battered furniture, and…they are having a 50% off already marked down prices on furniture. Bingo! (This is the kind of thing we junk shoppers get excited about!)

After perusing aisles of battered bunk beds and deck furniture, I find it. A small, oval coffee table that will look perfect painted white. Bonus: It will fit in my car trunk.

ReadytoRefinishOnce I get the table home, I spread out my handy paint cloth and gather my tools. It’s best to find a spot outside for this work, because the whole refinishing, white-washing thing can get messy. Also, I wear a mask to protect my airway from all the dust I’m about to create. I usually pick up some painter’s masks when I buy my other paint supplies. I wear my glasses in lieu of eye protection.

I’ll need heavy duty sand paper, a couple of soft-bristle paint brushes, primer, and paint. I can buy most of my supplies at home improvement stores like Orchard Supply Hardware, or directly from paint stores like Dunn-Edwards Paints, or Sherwin Williams Paint Store. Many people favor Benjamin Moore paints, but I like them all.

GatherYourToolsThe first step is to sand the old finish off the table–at least enough to rough it up and give it some “tooth” that a fresh coat of primer will stick to. Note to reader: If this is your first shabby chic refinishing project, start out with a small furniture piece like this coffee table. Why?

Sanding off the old finish, or even just roughing up the old finish, can take a long time and lots of elbow grease. I am sanding this table by hand. I wish I could say I was another “Rehab Addict” like Nicole Curtis, who loves her power tools, but the truth is, those things scare me! So, since I don’t want to devote an entire weekend to this project, and I’m not ready to invest in an electric sander, I’m starting small.

Sand off the old finishOnce I’ve “roughed up” the entire table from top to bottom, I wipe it down with a slightly damp cloth or dampened paper towel. I don’t want any bumpy dust spots sticking in my paint.

Now I am ready to prime the table with paint. I use a satin finish latex paint for both my primer and my top coats. I have heard you can find a spray on primer, which would save me a bunch of time, but those little cans get expensive, and I know I’ll need more than one.

I try to find traditional, brush-on paints in the sale bin at the big DIY retailers like The Home Depot or Lowes to use as my primer. I have gotten some great deals on paint that way in the past. Since the primer doesn’t have to be an official “primer,” and it doesn’t have to be the final color, I’m going to use some off-white paint I previously bought on sale as the primer for this table.

Primer coatOnce in a while when I’m looking for primer paints, I find a can of pure white, pale blue or aqua color paint in the sale bin at a fraction of the retail price. This happens when someone orders a custom-mix color of designer paint (even better, with no odor and low VOCs) that isn’t quite right for them, so they return it and it lands in the sale bin. So, word to the wise: Always check the sale bin at the home improvement store or paint store!

Second coatI allow the primer coat to dry outside for about an hour. Once it is no longer tacky to the touch, I am ready to apply my second coat of paint. The second coat should be in the final color. In this case, I’m using a pure white or “Super White” low VOC latex paint in satin finish from Valspar. The “Super White” paint color from most brands or paint lines is comparable to the popular “Designer White” from Benjamin Moore. For shabby chic furniture, off-white shades can look nice, too. However, for bright shabby chic or shabby beach painted furniture, I can’t go wrong with a crisp, pure white.

Seaside walkI know I need to let each coat of paint dry before I add the next one. This little table needed one coat of primer and two coats of top coat, plus a few touch ups. Once I’ve applied the final coat of “Super White,” I need to let it dry for another hour. So, I’m off to have lunch and take a walk along the Palos Verdes cliffs overlooking the beach. It never hurts to get a little added inspiration in the middle of a project!

Scuff the edges

When I return to project central, I check to make sure the top coat or final coat is dry enough so that I can begin scuffing up my edges to recreate that “shabby” look. According to Rachel Ashwell and other shabby chic mavens, it is best to scuff up the edges that would most likely get bumped into and organically scuffed during the natural life of a piece of furniture. I’m looking for the most exposed edges along the table top and table legs.

To get that “chippy paint” look I usually use a heavy duty sand paper (about #200 or so) attached to a sanding block. Sometimes I’ll use another rough tool like a patch of metal screen from a screen door or a metal file. I work my way around the entire table, using a relatively light touch with my sandpaper. I don’t want to overdo it!

Shabby chic or shabby beach coffee tableI’ve read that many people who re-sell shabby chic furniture will paint or spray a clear coat of varnish over their refinished shabby chic pieces, especially the edges or corners that have been artfully chipped or scuffed, to lock in the chippy look. I opt to skip this step.

My view is, it’s supposed to look gently battered, so a few additional scuffs that happen along the way will just add to the look. Or, maybe I’m just lazy.

At any rate, I’m ready to move the table inside and see how it looks in its new home. I move some things around, add accessories, and feel proud of myself that I completed this entire project in one day. And, I’m pretty happy with the finished look of this little coffee table, which looks quaint in my tiny beach apartment by the sea!

Shabby beach details

I hope you found this article helpful. If you did, or if you have a few shabby chic or furniture refinishing tips of your own to contribute, please feel free to add your comments here. I’d love to hear from you!

Seaside & Sage

Cabana stripes, beiges and blues

Cabana stripes, beiges, and blues echo the colors of the sea

I have a passion for home design. I also happen to live by the seaside in a California community filled with beach homes–from cottages to condos, and Cape Cods to bungalows, Spanish Revival homes to Santa Barbara haciendas, scattered among the early craftsman- and ranch-style homes. It is all prime real estate, sold by a local cadre of property experts who readily share their insights on the latest trends in home design and the preferences of buyers seeking some version of a coastal chic vibe. Home interiors here run the gamut from beach cottage or shabby beach, to plantation style and British colonial, with a bit of shabby chic and California casual mixed in. And, somehow, it all works!

Sea glass and sun-bleached wood accents

Sea glass and sun-bleached wood accents

I’m certified in home staging and interior redesign, but even without those credentials, I’d still be trolling the local antique shops and flea markets to source “shabby beach” or “shabby chic” furniture and accessories for friends and clients. My idea of a perfect weekend is visiting a few “open house” showings to get a sneak peek of the architecture and design of interior spaces along the California coast. I love to see how people–other home stagers and interior designers, and creative homeowners as well–rock their own personal beach style, and reinterpret the quintessential coastal lifestyle. I gather a lot of ideas and inspiration along the way…many of which find their way into my own home and the homes I design with friends and clients.

Seaside decor

Ocean-themed decor can add a coastal vibe

The great thing about beach style is that you don’t have to live by the beach to pull it off! If crisp white linens, weathered woods, and the bluish-green hues of the sea are what you want for your interior space, it can work just about anywhere. It doesn’t matter if you live in a Chicago apartment, a Brooklyn boxcar flat, or a mid-century duplex closer to the mountains than the sea. You can even create a hybrid-seaside style by using richer hues or earth tones mixed with some subtle coastal or nautical accents. There are plenty of retailers and design companies that have picked up on the coastal-beach trend, and are offering a range of beach-themed home decor, furnishings and accessories at affordable prices. In this blog I share with you some of the sage advice, ideas, inspirations, tips, tricks, DIY projects, shops and bargains I’ve uncovered that will help you curate your own version of seaside style and create the beach home of your dreams.