

 My latest obsession is with all things French. Let me be more specific. My latest obsession is with Paris-themed home décor, and figuring out how to use Parisian décor to create a French-themed party for my 12-year-old daughter. Why? First, my daughter has just completed a tough school year and is ready to celebrate the arrival of summer. Second, as any home decorating enthusiast will tell you, entertaining is just another excuse to design and decorate. Voila, the genesis for my daughter’s “Spring into Summer” Paris Party!
For this post, I decided to outline the steps I took to organize and design this really simple, low-budget Paris-themed spa party for girls, which can easily be modified to suit different ages, or for a ladies luncheon, tea party or bridal shower.
Paris Party Color Scheme: Hot Pink, Light Pink and Black
 As a first step, I selected some ready-made Paris-themed party décor and a color scheme to set the stage: hot pink, light pink and black. If you are into crafting, you could make your own party decor, but I decided to keep things simple by buying most of my supplies. I found many items at the Dollar Tree, including pink tablecloths, small containers for homemade spa treatments, and pink buckets to hold ice for cold drinks. I found more tiny containers and some little Eiffel Tower statues at Daiso Japan, where everything costs $1.50 per item.
 I chose hot pink, light pink and black as my color scheme partly because those colors are glamorous and girly, but primarily because the Paris-themed supplies from BirthdayExpress.com and OrientalTradingCompany.com already come in those colors. If you’re making your own supplies, you might opt for pale pink and white for a Shabby Chic Paris look, tailored black and white for a Coco Chanel vibe, or black and gold for a Vintage Paris party. It is best to coordinate your party look with just one or two dominant colors and one accent color.
Gather Ideas and Visual Inspiration for Your Paris Party…and then Go Shopping!
 I hopped onto Pinterest to gather ideas. I typed the search terms “Paris party” and found plenty of inspiration. I also got a bit overwhelmed. There are some amazing party organizers out there who approach entertaining as high art! Since I was planning a spa party in a garden courtyard for a group of pre-teen girls, I decided my version of a Paris party didn’t have to be too fancy. I recommend you simplify your search, as I did, by using available party decor to help you decide on a color scheme and a few decorating elements. Just one or two elements are enough to convey your theme and coordinate your look. You don’t need to go overboard and get every item available in the product line–a little can go a long way.
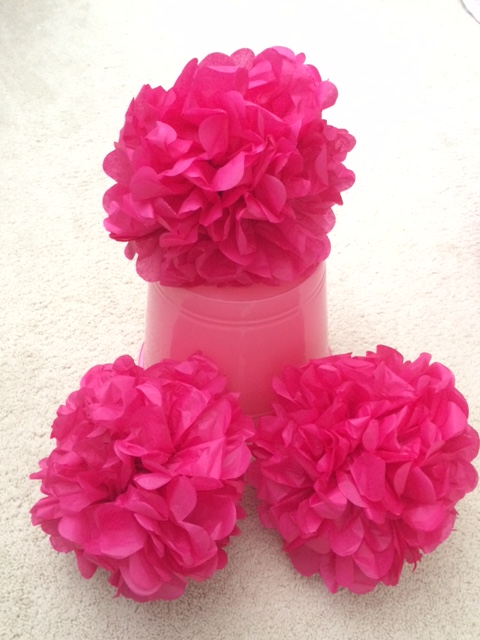
 The Eiffel Tower and spring flowers were my main elements, which coordinated well with the Paris-themed party supplies from BirthdayExpress and OrientalTradingCompany. After I’d ordered these supplies online, I actually took some of them with me to Michaels crafts store, to help me coordinate the colors with some fuchsia-colored Martha Stewart tissue paper pom poms, which I ended up placing in the bushes around the garden for a “Springtime in Paris” look. I also splurged on two black Eiffel Tower jewelry stands, which I used as centerpieces at two of the tables, with pink & black balloons attached. You can purchase less expensive ones made of cardboard, or craft a cardboard Eiffel Tower yourself (by following the instructions at ifferslittlenest.blogspot.com)
Offer a French-Inspired Menu, Artfully Arranged on a Buffet Table
 Repurpose, rent or borrow a rectangular table to push up against one wall (or at one side of your garden) to use as your buffet/food table. Drape it with a tablecloth in your color scheme and add a centerpiece. I draped the food table with a $1 table cloth from Dollar Tree and decorated it with vases of pink roses and Eiffel Tower figurines.
 I arranged food dishes and beverage containers of varying heights and shapes to create an easy-access food display with taller items in back and shorter items in front. Trays lined with doilies lend a romantic flair to the treat table.
Le Menu:
- Party-size meatballs in New Orleans-style barbecue sauce
- Croissants filled with chicken salad or turkey and Swiss
- French pasta salad
- Breadsticks
- Boule baguette filled with French onion dip, offered with cut vegetables and diced French bread
- Strawberries and whipped cream
- A selection of French cookies: Macarons, Madeleines, Palmiers, and Lady Fingers
- Chocolate cupcakes frosted with chocolate ganache
- Raspberry Tart
- Pomegranate Iced Tea
- Sparkling Pink Lemonade
- Sparkling Pink Champagne (for the adults in attendance)
 If you are a “non-cook” like me, you can buy most of the food from this menu pre-cooked or pre-prepared from Trader Joe’s. You’ll just need to be creative by mixing sauces and other ready-made ingredients together to infuse basic foods with French flavors.
For example, I mixed apricot jam into the New Orleans barbecue sauce to add an element of Provence to the mix. The pasta salad was tossed with a container of TJ’s pesto sauce, since basil is often used in French Country cooking.
Set up a Spa Table or Spa “Mixing Station” Stocked with Simple Ingredients from Your Kitchen
 I set up a spa table in the corner of the courtyard, draped it with a Shabby Chic bedspread, and supplied it with a stack of mixing bowls, a container of mixing spoons, measuring cups and measuring spoons, a basket of tiny containers to fill with spa treats, and all the spa-making ingredients needed for making homemade lip gloss, a facial masque, and body scrub.
 I printed out the recipes for each spa treat on small cards and placed them on a tray at the front of the spa table so that guests could grab a recipe, and add the basic ingredients they needed to a bowl. Once they had their basic ingredients in a mixing bowl, they sat down with a partner to decide on which essence oils to add before mixing up each spa treatment and filling their little containers to take home. All the recipes I used are non-toxic (and even edible, so safe for little kids), but adult supervision is recommended during mixing to avoid a mess or over-saturating a mixture with the too much food flavoring or essential oil.
Recipe for lip gloss: 1 Tblsp petroleum jelly, 3 drops honey, 2 drops food flavoring
Recipe for facial masque: 1 Tblsp heavy cream, 4 tsp baking soda, 1/2 Tblsp honey
Recipe for sugar body scrub: 1/2 cup granulated sugar, 1/4 cup oil, 2 drops essential oil, 1 tsp dried flowers
Spa Mixers:
- Vaseline (petroleum jelly, unscented)
- Honey
- Heavy cream
- Baking soda
- Vanilla extract
- Orange extract
- Spearmint essence oil
- Granulated sugar
- Sunflower or coconut oil
- Dried lavender flowers
Party Favor Boxes or Bags Can Include Spa Treats, and Containers for Making Your Own

 Guests each received a party favor box tagged with their name on it as part of the place setting at their seat. Guests opened their boxes to find a selection of empty spa containers to use at the party, along with self-pampering treats like a French sachet or soap, an eye masque, and a French Manicure nail polish to take home.
 After the guests had eaten their fill of French foods, we organized everyone into pairs and had them mix up their spa treatments together. Since I was busy taking photos of guests at the “French Photo Booth” equipped with a selection of French-inspired props, I didn’t have time to demonstrate to the kids how to mix up the spa potions. Luckily, the adult women in attendance stepped in to help out (Merci beaucoup)!
Create Your Own “French Photo Booth” with Backdrop and Props for Souvenir Photos
 For the French Photo Booth I bought a white sheet of poster board at the Dollar Tree and painted a Parisian-inspired scene on it to use as a backdrop for photos.
If you’re not artistically inclined, you can purchase a selection of Paris-themed backdrops from BirthdayExpress, OrientalTradingCompany and other party supply stores.
You might also spray paint an empty, ornate picture frame in black, white or pink, and have guests hold it up to frame their face for their Kodak moment.
I ordered a set of “Paris Party” photo props from the online party supply store, which made for some fun photos that I emailed to everyone after the party.
 As party hostess, I was running around too much to stop and take proper photos of the entire set up before the party had ended. Luckily, a friend of mine who attended with her daughter helped me clear away some of the clutter and chaos in time to grab the few snapshots you see here.
Party planner tip: Get a bouquet of helium balloons in your color scheme on the day of your party. Don’t buy balloons in advance or they may lose their helium from the heat of the sun and refuse to float before your party gets under way. We bought our balloons the night before, and by the time we had served lunch during the party, all our balloons had sunk to the ground (which is another reason you don’t see any wide angle shots or photos of balloons here.)
All in all, this “Spring into Summer” Paris Party for girls was a fun time for all and fairly easy to pull together. For a few short hours, our courtyard was transformed into Spring in Paris for une belle fete!


